Tutorials:
- Birth of
the baby
- Birth of
the placenta
- Local anesthesia for vaginal/
perineal repair
- Repair of the Perineum
|
Tutorial 2: Birth of the Placenta
Birth of the Normal Placenta During Childbirth
4. Procedures for Birth of the Normal Placenta
Key steps in safe delivery of the placenta with minimal blood loss:
- Attempt delivery only when the placenta is fully separated
to avoid
- uterine inversion or
- pulling off a section of placenta from the wall of the uterus leaving the remainder attached, thus creating an open bleeding area in the uterine wall
- Check for separation by:
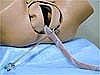 |
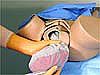
- Placing the ring forceps, after the birth, on the portion of the umbilical cord that is just outside the introitus and letting it hang down by its own weight.
|
 |
- Placing your hand over the uterus through the abdominal wall (inside a folded sterile towel) to note when the uterus contracts into a hard globular ball which rises slightly under your hand.
|
| |
- Requesting the mother to tell you, after the delivery of the baby, when she next has contractions or "cramps."
|
| |
- Noting whether there is a small gush of blood and/or lengthening of the cord. This may not always be readily apparent.
|
 |
- Noting the time of the birth of the baby so you know how long you have waited for separation of the placenta. Many placentas do not separate within the first 10 minutes and you should check for separation at that time, unless it is apparent before.
 |
See the video on signs of separation (model) |
When the mother feels a contraction, or a gush of blood or cord lengthening or a change in the uterine firmness is noted, or ten or more minutes have elapsed, ask the mother to bear down at the same time that you:
|
|
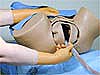
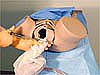
- Provide some firm pressure against the fundus of the uterus with your cupped hand, and your thumb placed just above the pubic bone to keep the uterus from entering the pelvis and a) causing spurious cord lengthening or other false evidence of separation, or b) even inverting the uterus.
|
- Provide some steady cord traction to note whether there is a sense of "give" as the placenta moves into the vagina and the cord lengthens, or conversely, does not progress --- in which case you cease your maneuvers and wait.
|
 |
- If you are uncertain whether the placenta has actually separated, you may also follow the cord with your hand in the vagina, up to the cervix, to determine if the placenta is trapped in the cervical os, or whether the cord disappears into the uterus.
|
|
See the video on checking separation (model) |
|
|
See the video on the placenta trapped in the cervical os (model) |
Important Note: In the absence of heavy bleeding, there is no hurry to deliver the placenta. It is normal and safe, if there is no bleeding, to wait up to an hour, checking for separation periodically
The placenta has been known to stay attached to the uterine wall for days after a delivery. If this occurs because there is an acreta, this is the safe state until the problem can be evaluated more completely.
Conversely, if you do not make an accurate diagnosis of separation and separation has indeed occured, then the uterus may be silently filling with blood. This is another reason for keeping your abdominal hand over the uterus at all times until the delivery of the placenta is imminent at the introitus.
|
- Use maternal efforts to deliver the placenta,
assisted by the following simultaneous maneuvers from you as needed, when you believe separation has occurred.
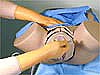 |
- Maintain your abdominal hand over the uterus, using your flattened fingers just above the pubic bone to aid the placenta as it exits the cervical os into the vagina. Instead of pressure with flattened fingers, the Brandt Andrews manuver may also be used, but this is more uncomfortable for the mother.
|
 |
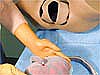
- Place your fingers around the ring forceps at the point where the cord is attached, and apply steady cord traction with a downward motion, then upward along the curve of Carus as the placenta traverses the vagina to the introitus.
|
 |
- When the placenta is visable at the introitus, lift it partially through with the hand holding the ring forceps.
|
 |
- Remove your other hand from the abdomen and let the placenta fall into your hands. At this point drop the cord and the ring forceps.
|
 |
- Move the placenta up and down and rotate it gently to bring it through the os.
|
 |
- Continue to rotate the placenta to make a thick cord of the trailing membranes, if necessary.
|
 |
- If this is not sufficent, grasp the membranes with the ring forceps to encompass them laterally.
|
 |
- Rotate the ring forceps to make a thicker cord of membranes and then gently tease the membranes through the introitus by a slight up and down movement.
|
| |
Important Note: Remember: slow controlled delivery to avoid tearing the cord or membranes.
|
|
See the video on delivery of the placenta (model) |
|
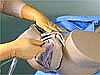
When the placenta is out, massage the uterus once or twice to stimulate contraction, and wipe the blood away from the introitus and lower vaginal area to determine if you have additional bleeding
.
Additional Reading:
Long, Phyillis J. Management of the Third Stage of Labor: A Review.
Journal of Nurse-Midwifery Volume 31, No. 3, May-June 1986. pp. 135-140.
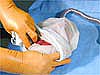
Keeping an eye on the introitus for bleeding, conduct a complete inspection of the fetal and maternal surfaces of the placenta. This should take no longer than 15 seconds and is a critical step before requesting oxytocin or before proceeding to manage a heavy bleed or hemorrhage, if there is a problem. (see also Variations in the Normal Placenta)
 |
- Start with the fetal surface since that is the most common presentation of the placenta at birth, e.g., "shiny Schultz". Note the general size and shape and whether there are any variations such as a circumvallate placenta (an opaque ring on the fetal surface formed by a doubling back of the chorion and amnion).
|

|
- Note the placement of the cord insertion on the placenta, e.g, concentric (in the middle), eccentric (away from the middle), or more rarely a Battledore placenta (at the edge of the placenta). Occasionally one may see a velamentous insertion of the cord in which the umbilical vessels run through the membranes from the cord to the placenta, without the protection of the gelatinous portion of the cord, which ends several centimeters above where the vessels insert into the placenta.
|
 |
- Turn the placenta over to the maternal surface. Pull the membranes up gently to identify the location of the hole which resulted from the rupture of the membranes. A hole near the center of the membranes indicates a placenta attached in the upper portion of the uterus. A hole near an edge of a placenta indicates a low-lying placenta, e.g., one attached in the lower uterine segment closer to the cervical os.
|
 |
- After noting whether there are any tears in the membranes or blood vessels passing through them, pull the membranes completely back to expose the maternal surface of the placenta. Note the cotyledons which make up a normally thick, red surface and ensure that there is not a missing section. Look for infarctions (white, thickened areas), or a pale overall color. These signs may indicate an aging placenta, or one that has not had a healthy maternal/fetal transfer unit. Run your finger around the edge of the placenta to determine whether there are any vessels or succinturiate lobes in the membranes.
|
|
See the video on inspection of the placenta (model) |
|
|
See the video on inspection of the placenta (actual placenta)
|
Additional Reading:
Schuler-Maloney Doris. Placental Triage of the Singleton Placenta. Journal of Midwifery and Women's Health Volume 45, No.2, March-April 2000. pp. 104-113. |
|
- Ask for Oxytocin or Methergine if needed. These medications are not usually required in a normal third stage of labor with minimal bleeding.
click on the links below to continue:
- Introduction
- Normal Physiology of the third stage
- Anatomy and Variations of the normal placenta
- Procedures for the birth of the normal placenta
- End Note
|
